Total Time: 2.5 hours
Quick Links
- Introduction & Safety
- Fabrication Quest
- Software & Hardware for the Lab
- Part (0):Principles of Capacitive Sensing
- Part (1): Building a Single-input Cap-Sensor w/ Arduino Cap-Sense Pin
- Part (2): Wiring of multiple Inputs with a Multiplexer
- Part(3): Arduino Code for CapSense Multiplexer Combination
- Part(4): Exploring Materials 🚨(Remixing)🚨
- Part (5): Designing a Guitar
- Discussion & Reflections
Lab 8: Building Sensors from Scratch through Capacitive Sensing!
🦺 Introduction & Safety
(1 minute read)In this lab, you will learn how to make a capacitive sensor from scratch!You will then use the capacitive sensors as input for your guitar hero lab.
In this lab, you'll create a capacitive sensors and learn:- ✅ Basic principles of capacitive sensing
- ✅ How to use the Arduino built pin for a single capacitive sensing
- ✅ How to connect to a capacitive touch multiplexer for multiple capacitive sensing input
- ✅ How to determine capacitive sensing sensitivity through resistors and process data
- ✅ How to use variuous matreials (spray paint, cloth, mesh, 3D printing filament) to create capacitive touch input with.
Before we start, please make sure you understand the following safety precautions:
- Electrical Wiring: Ensure your Arduino is disconnected from any power source before connecting components.
- Soldering: Always work in a well-ventilated area, wear protective gear, and avoid touching the hot soldering iron or molten solder.
🔨 Fabrication Quest of the Day
- Today, you will will:
- Apply copper tape to a wooden template plank and solder it to the capacitive pins.
- Remix the guitar for your next lab by adding conductive material of your choice
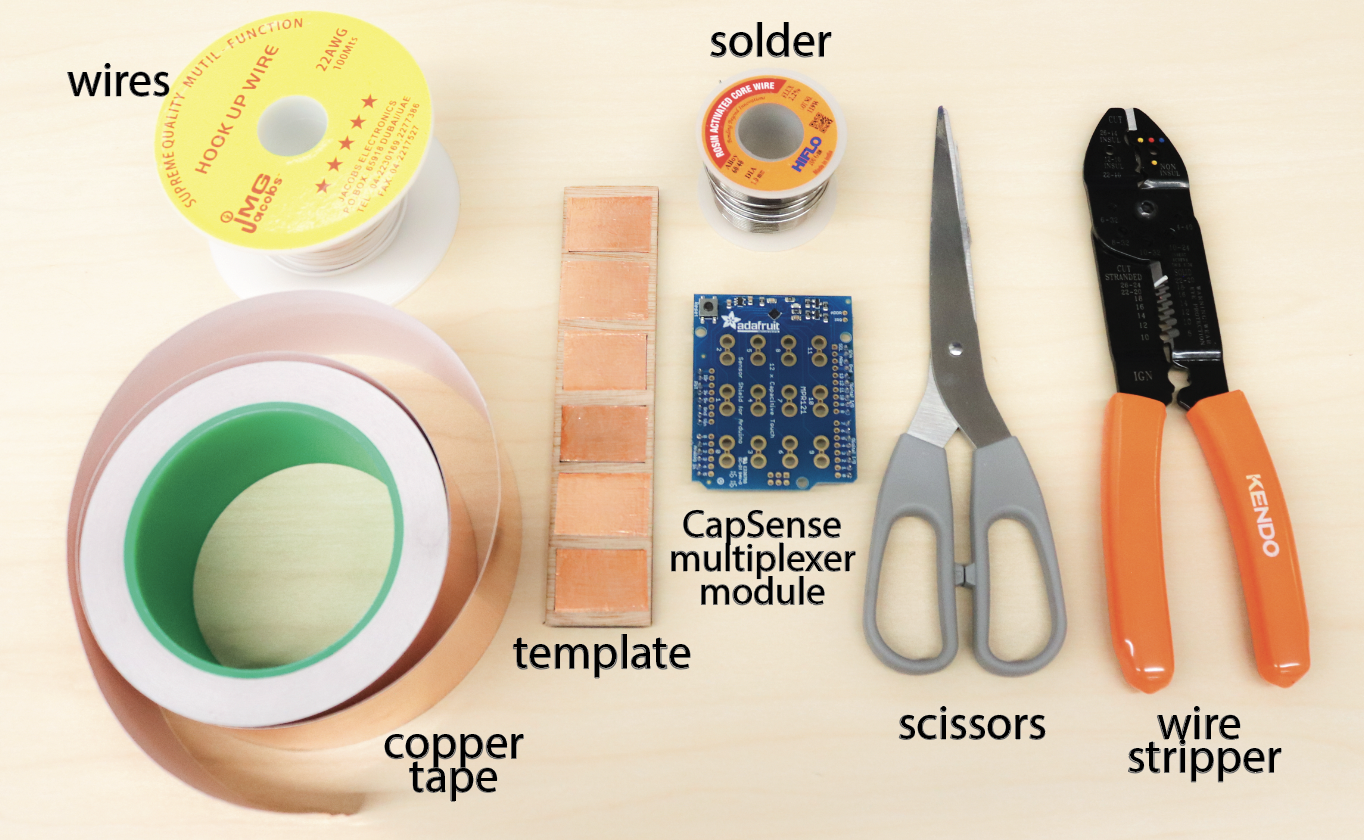
- Arduino
- Capacitive Sensing multiplexer
- Wooden plank template
- Copper Tape
🏗️ Software & Hardware
Software:
- Fusion360 (must download before workshop)
- Adobe Illustrator *Can download through Creative Cloud*
- Arduino
PPE:
- Safety goggles
- Face mask
- Nitrile gloves
Hardware:
- Prefabricated piece (x1)
- Copper Tape
- Solder
- Wires
- Wire cutter
- Scissors
- Remix material: spray paint, conductive fielament, conductive mesh etc
Machines:
- Laser cutter
- Soldering iron
- 3D printer
- Airbrush
Part (0): Principles of Capacitive Sensing- RECAP (1 min)
What is Capacitive Sensing?
Capacitive sensing is a versatile method for detecting touch and proximity. It’s widely used in devices like smartphones, touchpads, and interactive displays.
How It Works
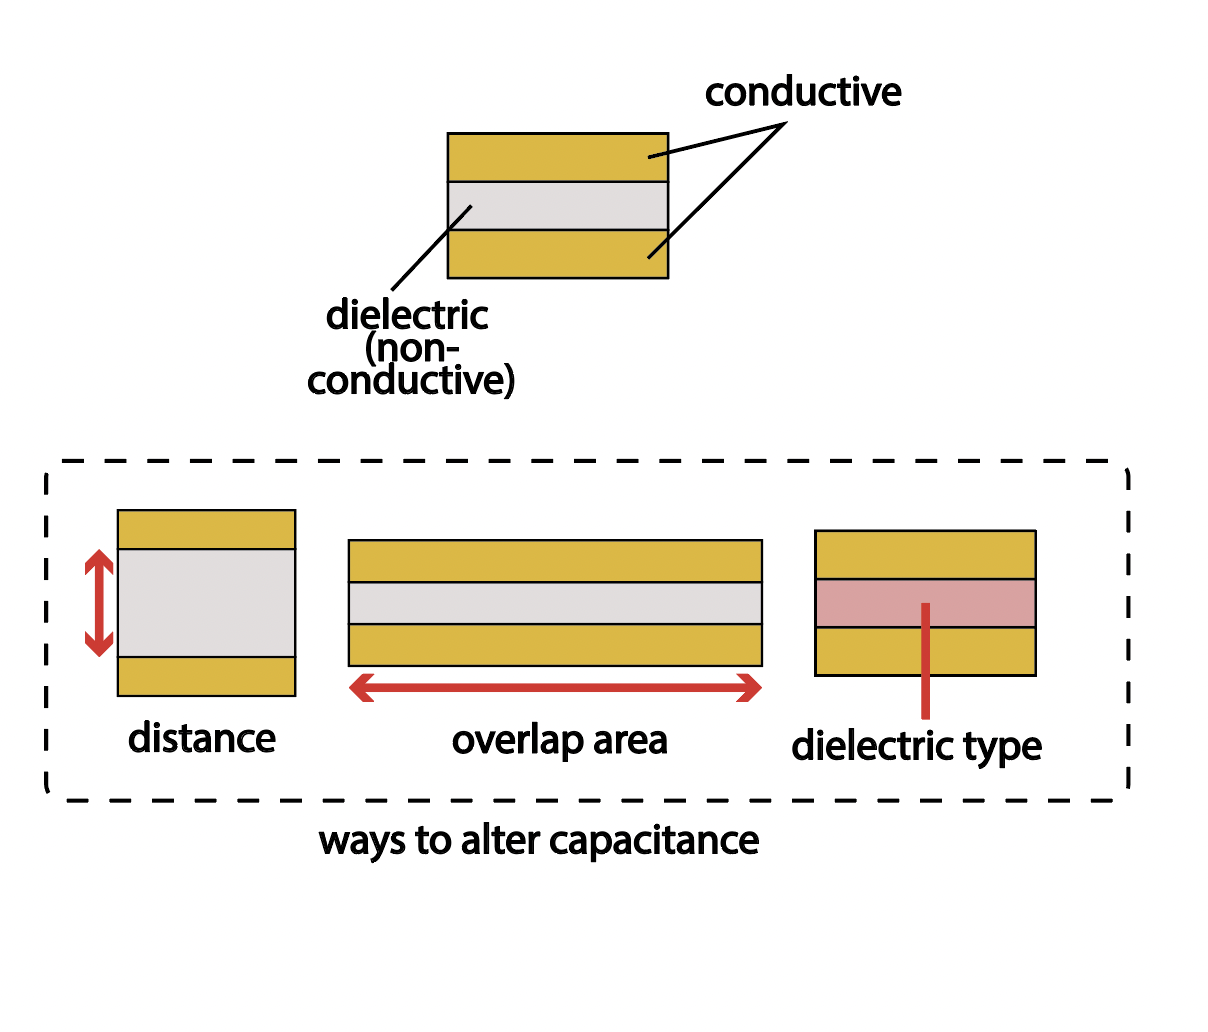
Capacitive sensing relies on the principle of capacitance—the ability of a system to store electrical charge. It requires just two materials: a conductive plate connected to power and another to ground, with a dielectric (non-conductive material) between them. The capacitance is calculated using the formula:
C = εA/d
- ε: Permittivity of the dielectric.
- A: Area of the conductive plates.
- d: Distance between the plates.
What Affects Capacitance?
Capacitance changes when any of these factors are altered, such as the dielectric properties or the proximity of a conductive object (e.g., a finger). Touch reduces the distance (d), increasing capacitance and altering the signal.
Applications
Capacitive sensing is a foundation for touchscreens, proximity sensors, and even gesture recognition, proving its importance in modern technology.
Part (1): Building a Single-input Cap-Sensor w/ Arduino Cap-Sense Pin (20 mins)

🔌 Circuit Setup
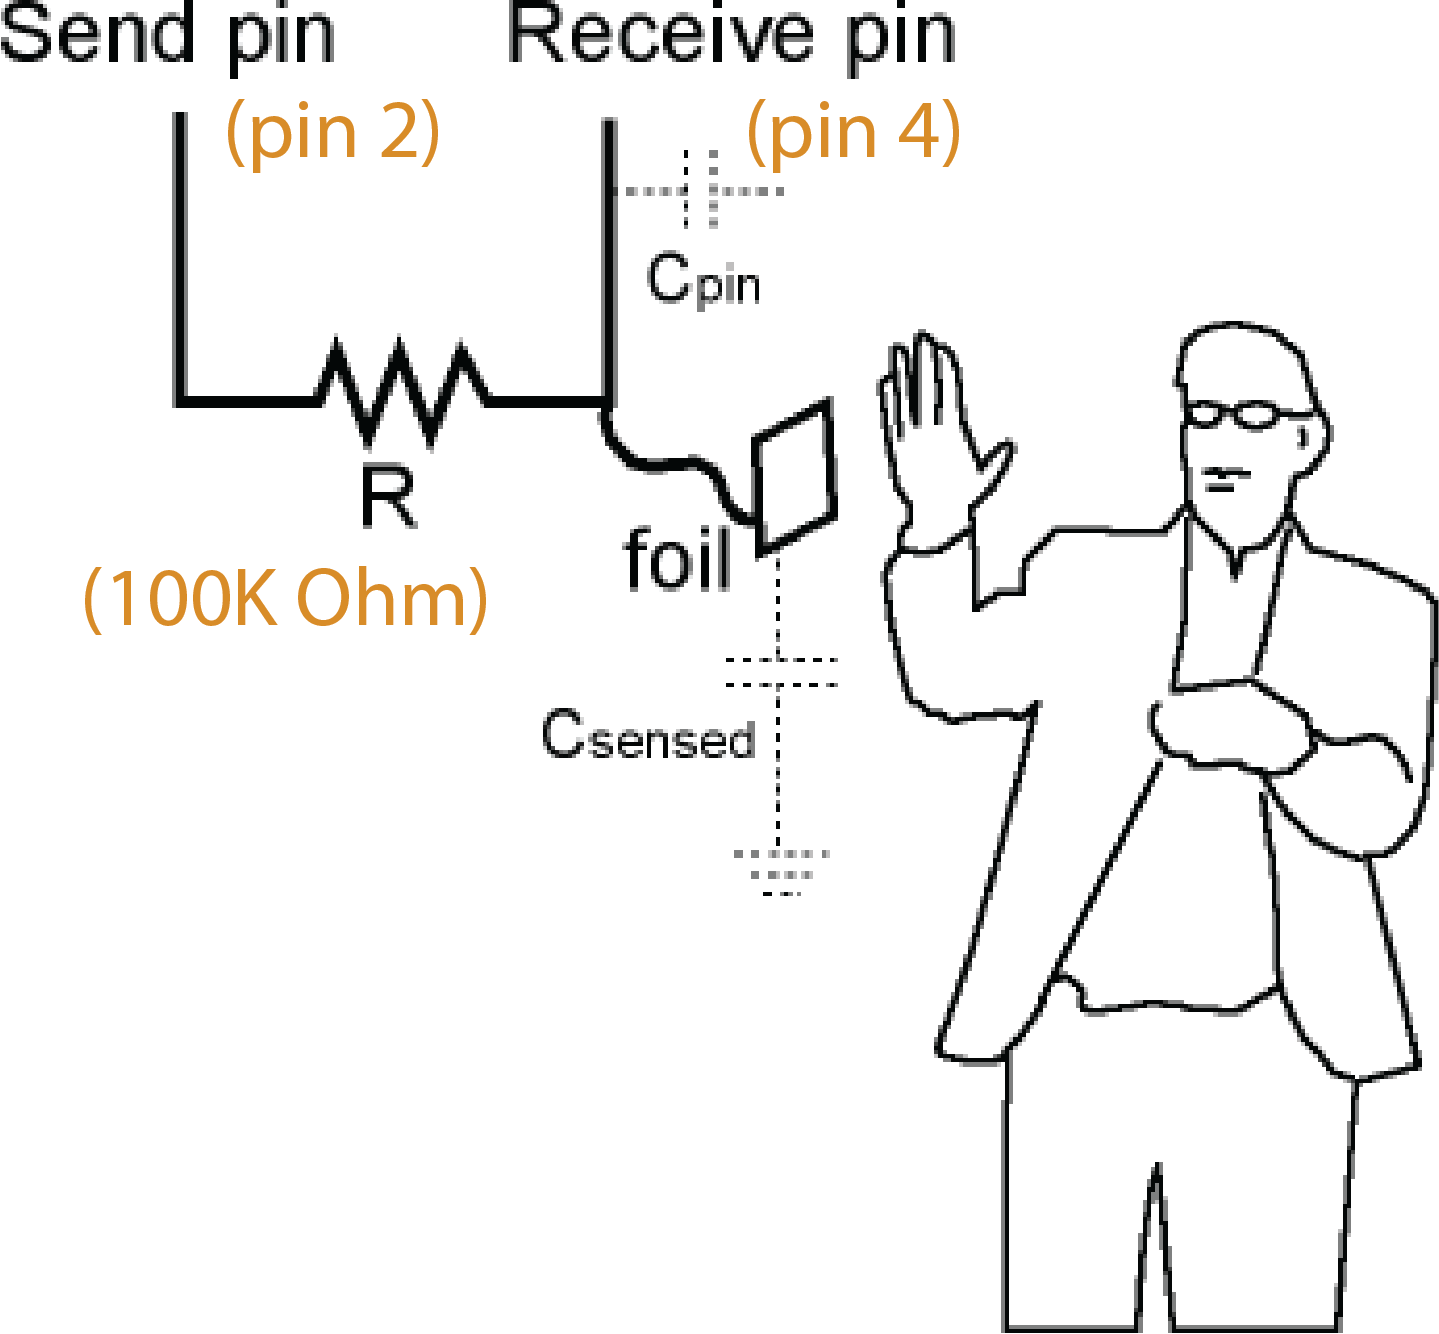
We will implement touch sensing using the principle of capacitive touch sensing. The setup includes:
- 📤 Sender Pin: Outputs a signal.
- 📥 Receiver Pin: Listens to the signal.
- 🔘 Touch Button: Connected between the sender and receiver pins.
⚙️ How It Works
When a user touches the touch button:
- The signal from the sender pin takes longer to discharge.
- This happens because the user’s finger acts as a capacitive object. 🖐️
- The microcontroller detects the touch by measuring the time delay in signal discharge. ⏱️
To delay the discharge from the user's finger and make the time difference measurable on the Arduino, you will add a resistor between the sender and the receiver pin.
⚙️ Choosing the Right Resistor
- 🔍 High Resistance (e.g., 10MΩ): Enables sensing a finger up to 10cm away but slows discharge, reducing speed.
- ⏱️ Low Resistance (e.g., 10kΩ): Faster discharge but less sensitive, unsuitable for larger distances.
- 👌 Optimal Choice (100kΩ): Balances sensitivity and speed, perfect for touch sensing without hover detection.
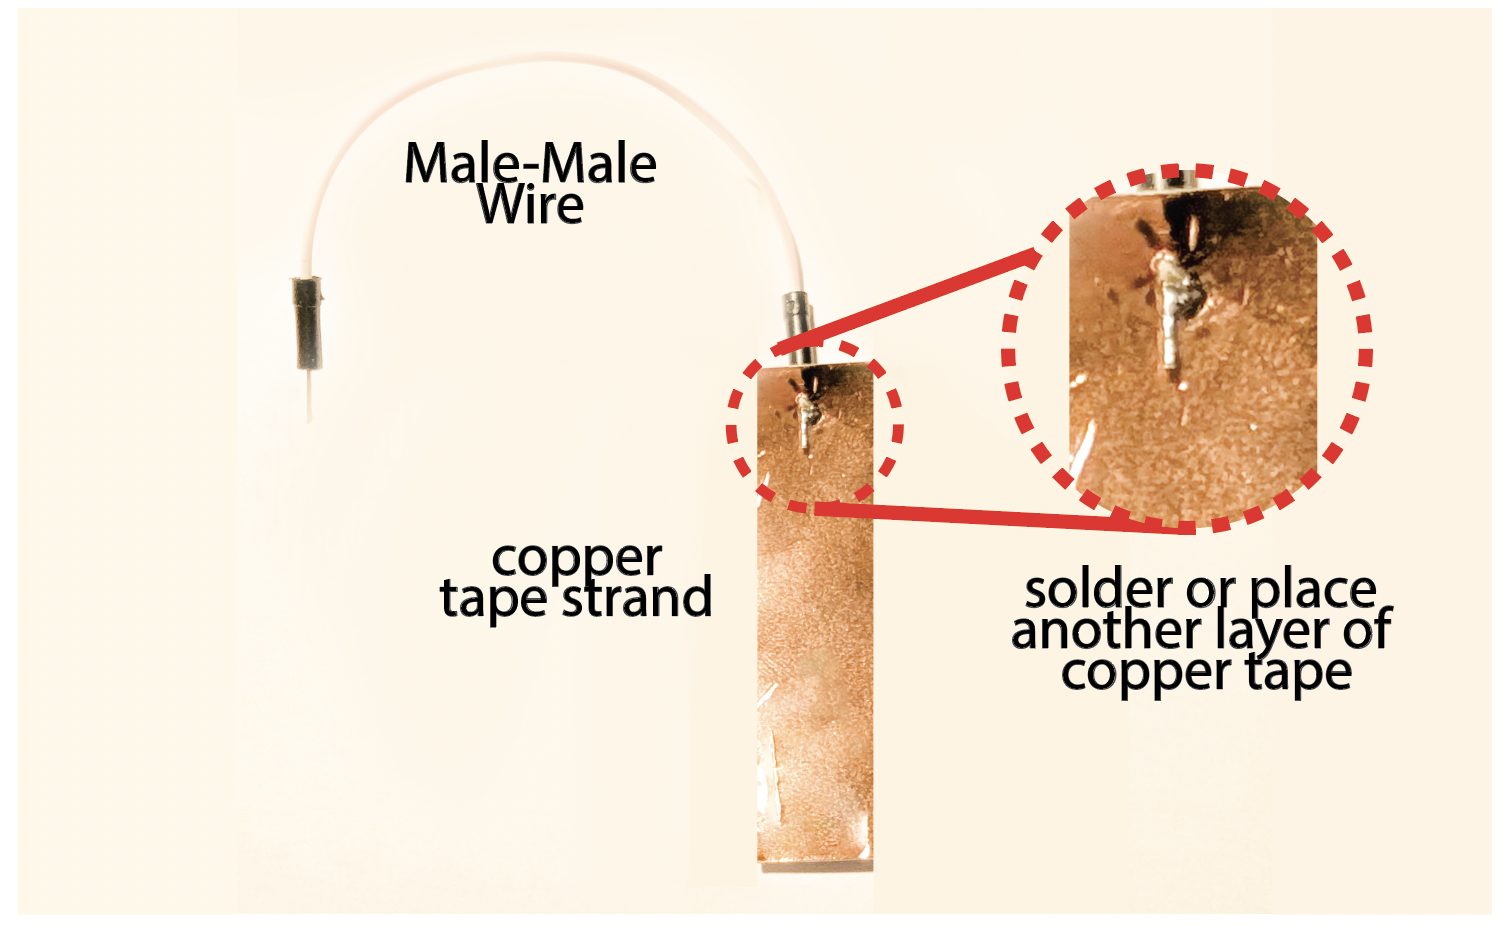
Lets first make our capacitive touch pad. Take a roughly finger sized piece of copper tape. Poke a M-M (Male to Male; ie pointy end) jumper cable through about 1/2cm from one end (careful not to poke yourself). Then solder the jumper down to the copper. You may also just attach a smallr piece of copper tape on top to be faster. It should look like this:
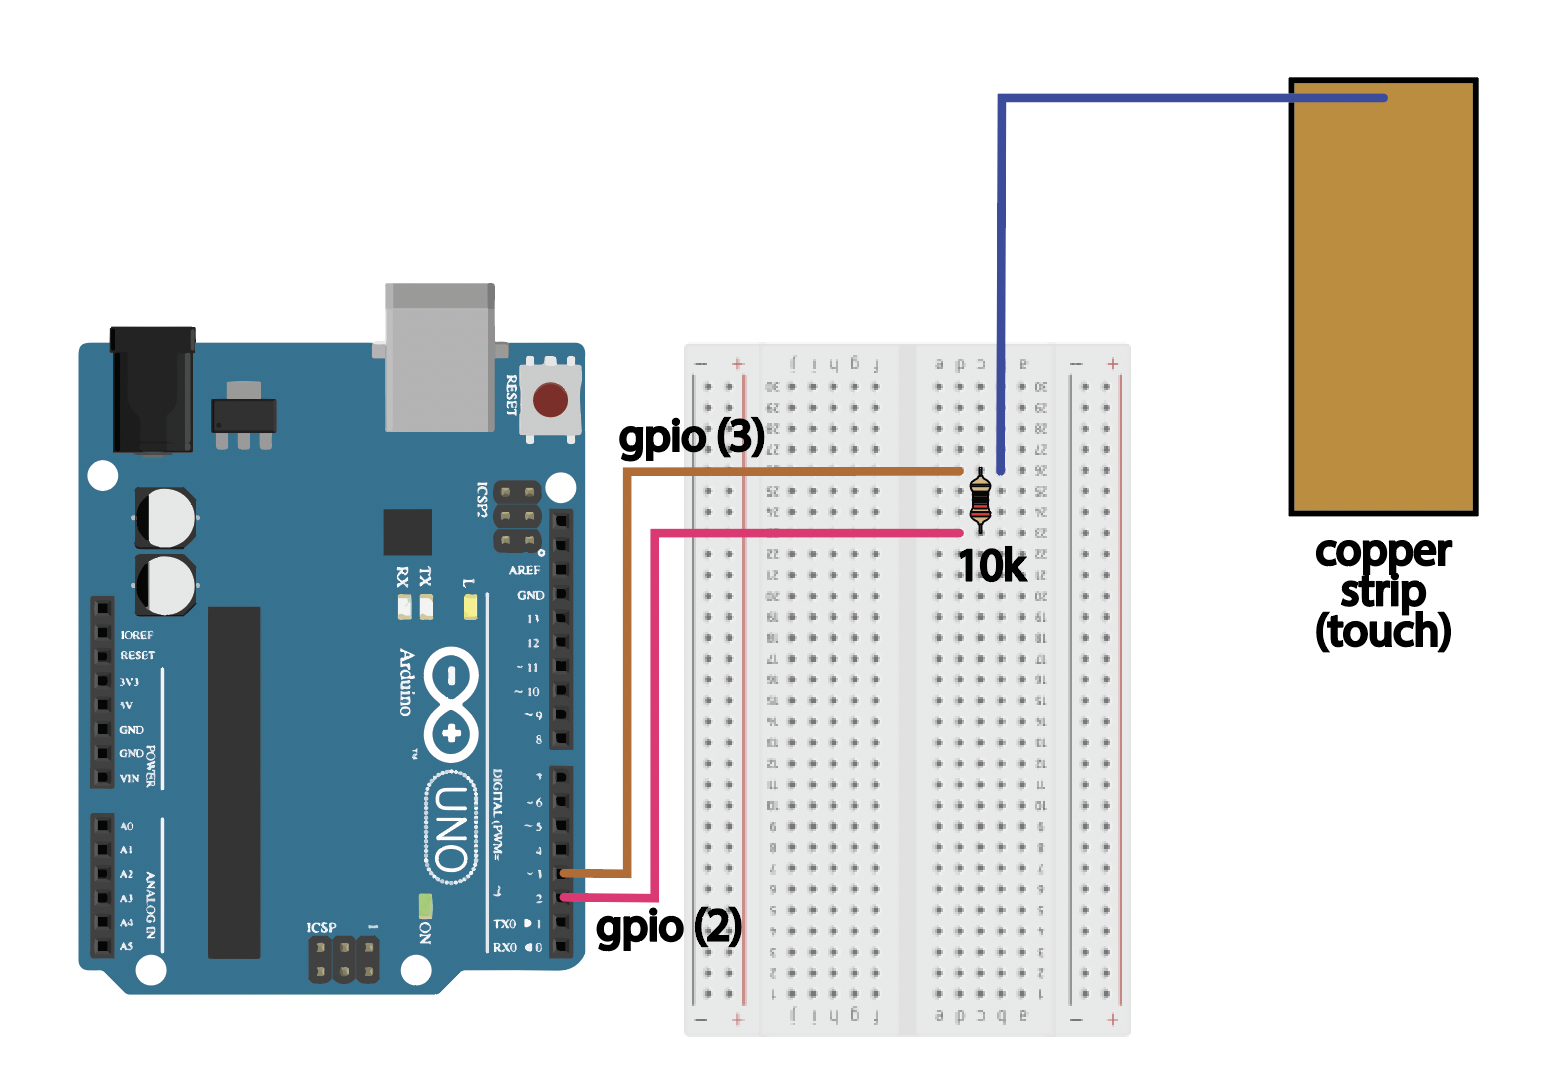
Let's build the circuit and write the code for one touch button, later we will show you how to do this for multiple touch inputs. To get started, follow these steps:
- Sender Pin: For the sender pin, you can use any GPIO pin on the Ardiuno. For this first touch button, we ask you to use GPIO pin 2.
- Receiver Pin: For the receiver pin, it is best to use the ardiuno capactive touch pin 3. This pins is optimized to serve as receivers for capacitive sensing and therefore return cleaner signals, so we will use them for our sensing application.
- Resistor: We will examine a 10k (Yes 10k) Ohm resistor. Add the resistor to the circuit between your sender and receiver pin for your first touch button as shown in the schematic image above.
The result should look something like this.
Install the CapacitiveSensor library by Paul Badger. Then, upload the following code to your ardiuno:
❗ You may need to close and reopen Arduino after installing the library ❗
 /*******************************************************************************
* Capacitive Sensing for Touch and Proximity
*
* Reads values from two capacitive sensors and displays results on the Serial Plotter.
*******************************************************************************/

#include <CapacitiveSensor.h>

// Define sender and receiver pins for the two touch pads
int sender = 2; // Shared sender pin
int touch_pin = 3; // Receiver for touch pad 2

// Number of samples to take per reading
int samples_touch = 10;

// Create capacitive sensor objects
CapacitiveSensor sensor1 = CapacitiveSensor(sender, touch_pin);

void setup() {
    Serial.begin(9600); // Initialize Serial communication
    Serial.println("Capacitive Touch Sensor Ready!");
}

void loop() {
    // Read capacitive values
    double analog_touch_1 = sensor1.capacitiveSensor(samples_touch);

    // Print values to Serial Plotter (comma-separated for multi-channel display)
    Serial.print(analog_touch_1);
    Serial.println(",");

    delay(10);
}
Examine the output on the serial plotter (top right button) in the Ardiuno IDE.
You will probably see something similiar to the graph below, where the values
"spike up" when you touch the pad.
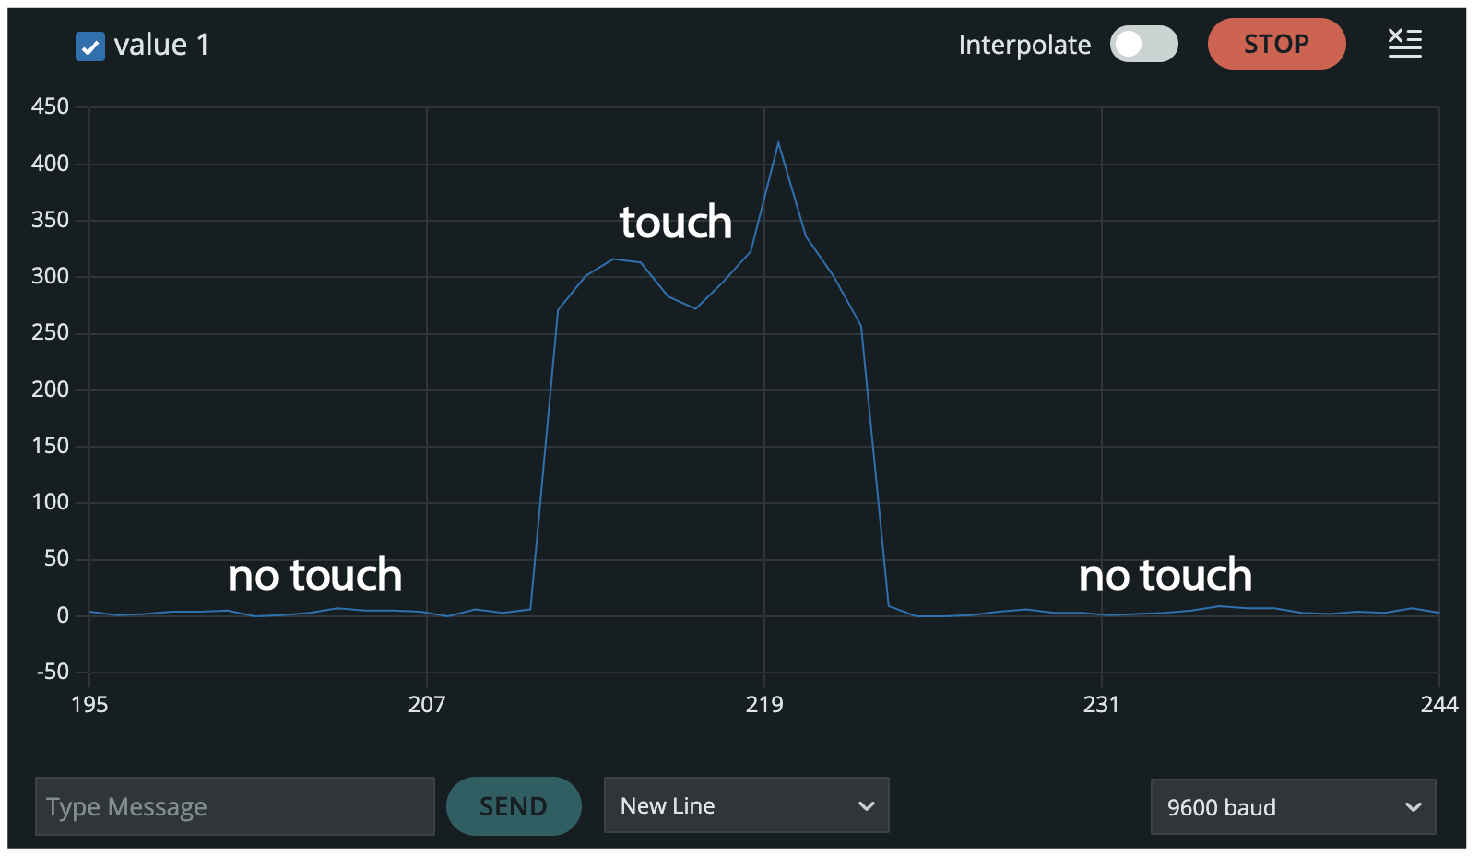
💡 Now swap the 10k resistor for a 1M Ohm resistor. How does it change?
Checkoff 1
Ask your instructor for a check-off on completing Part (1) and answer the question on the effect of swapping 10k Ohm with 1M Ohm.Part (2): Wiring of multiple Inputs with a Multiplexer (30 minutes)
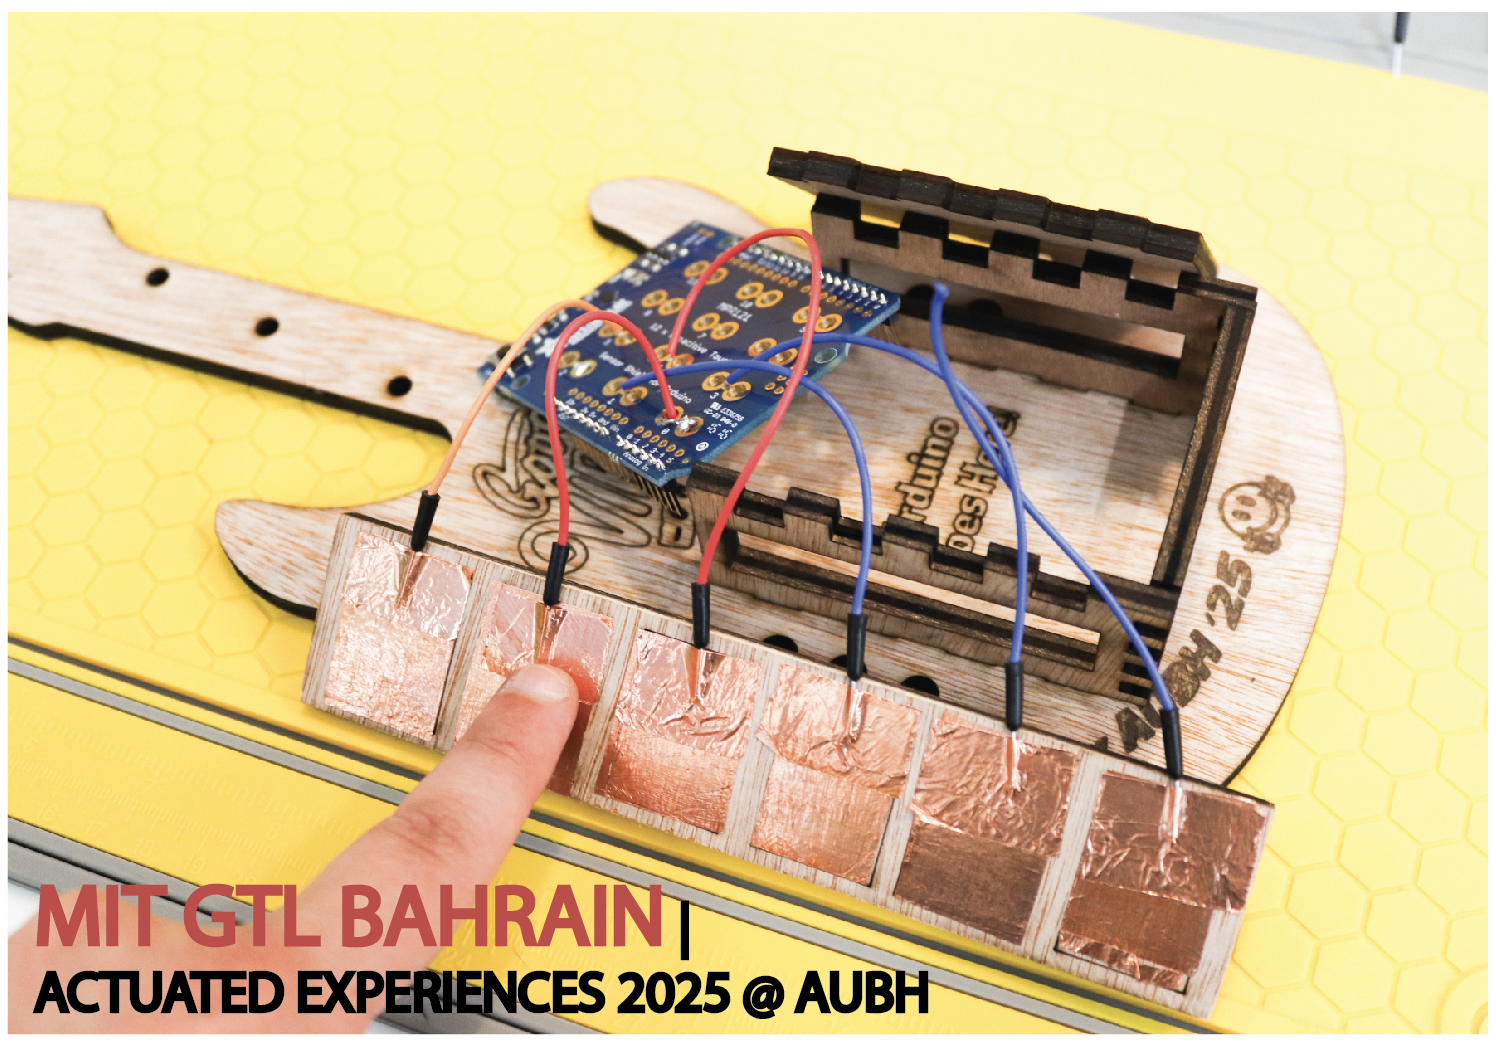
The MPR121 Adafruit shield allows us to use 12 capacitive touch sensors. Often we only need to know if the sensor is "touched" or "not-touched." The shield and library can set an automatic threshold for any object. The shield is made for alligator clips, in which we can clip to just about anything. We can also solder to it, which we would like you to do first.
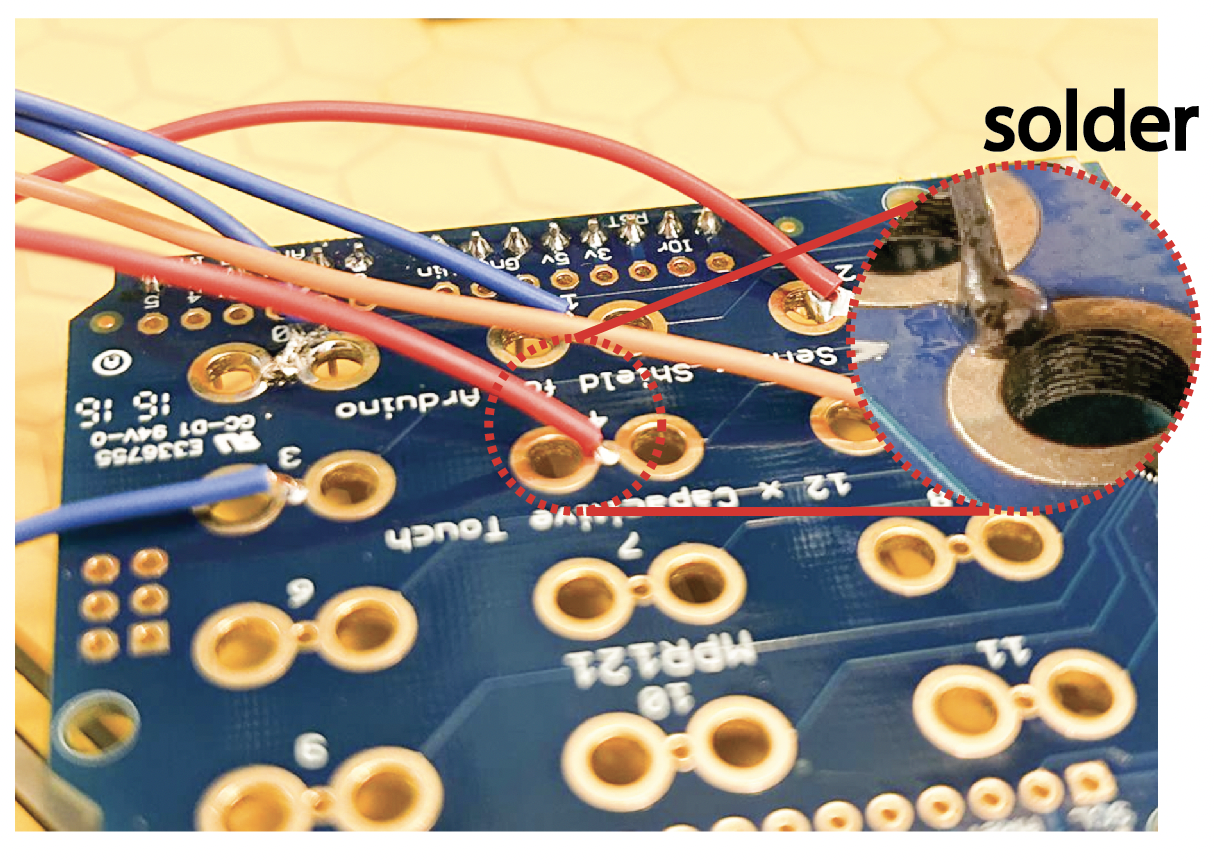
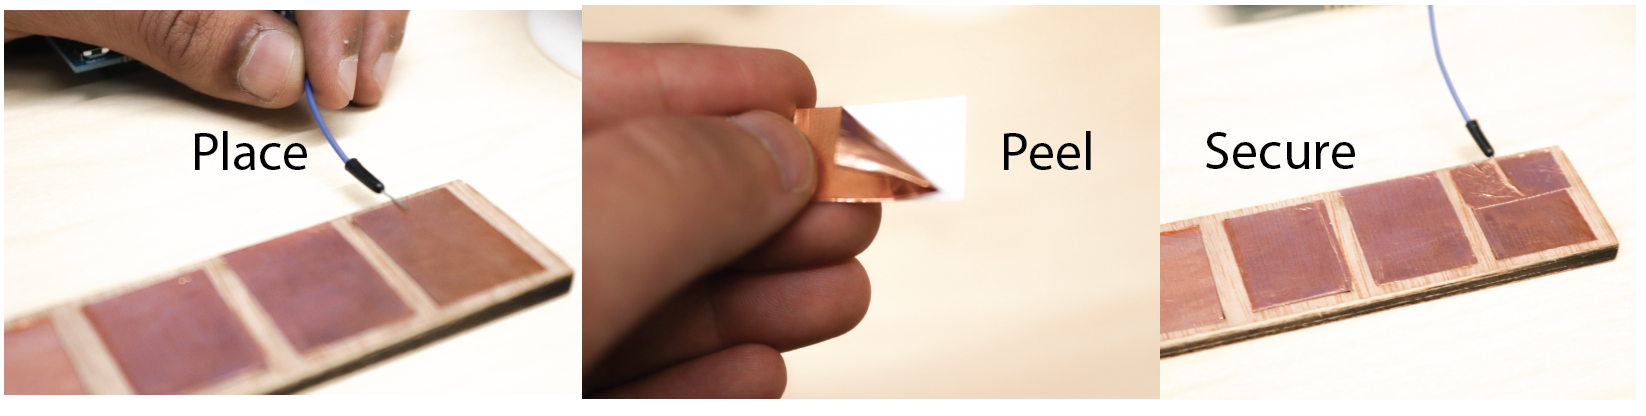
Create a total of 6 capacitive touch sensors out the copper tape (you can swap later with any material you want during your remix).
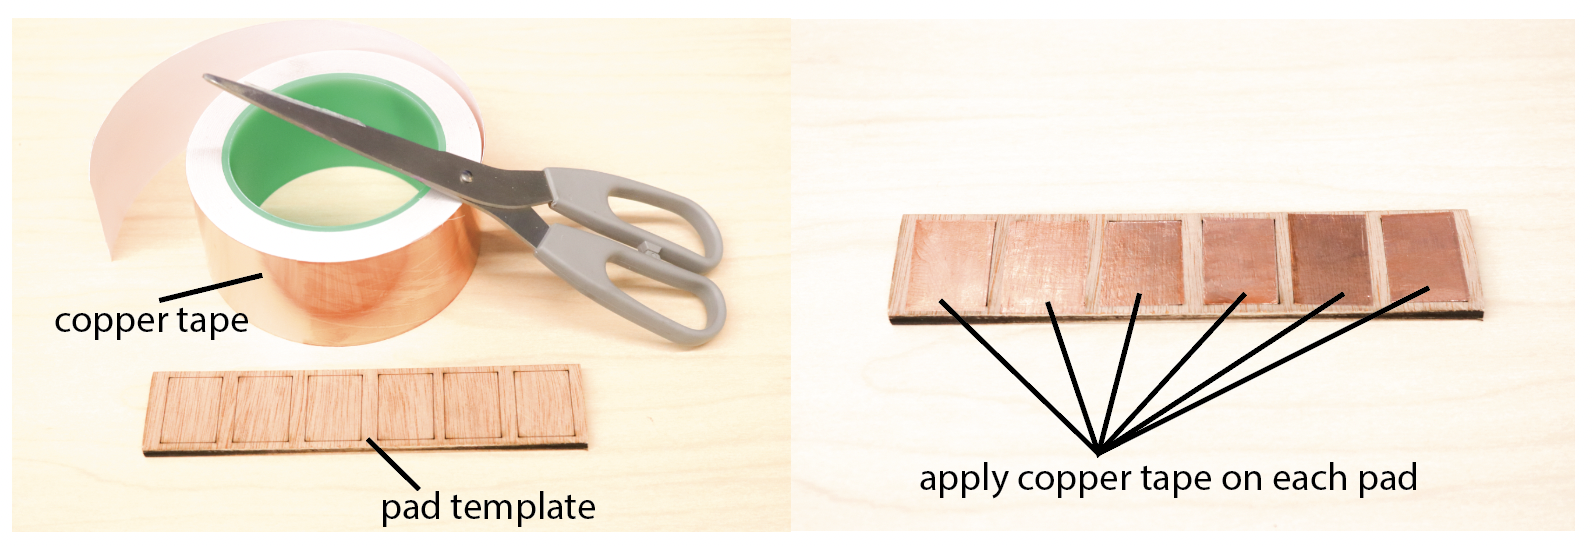
First apply the copper tape
into the template pads, then place the wire on the pad, when it's snugly on the pad, put another layer of copper tape on top of it-- this is so it's not permenant and you can just swap out materials later much more quickly.
(Make sure the copper tape on adjacent pads don't touch!!).
Part (3): Arduino Code for CapSense Multiplexer Combination (10 minutes)
Next, connect the shield to the Arduino by placing it on top of the Arduino (similar to the picture below);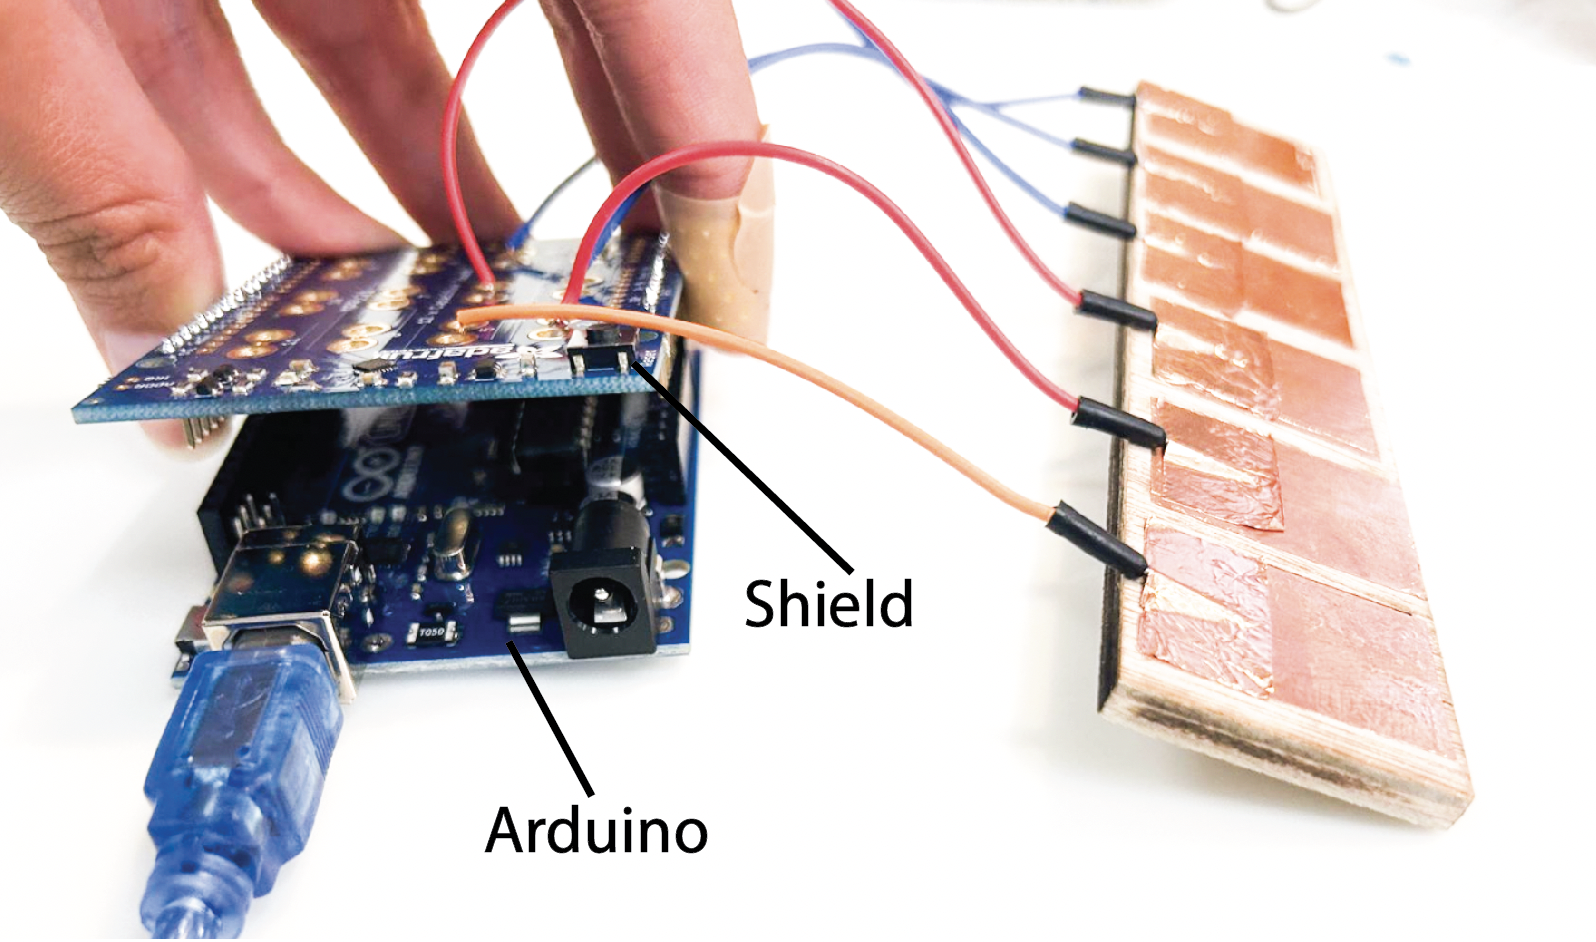
Using the shield is easy. Install the Adafruit MPR121 library. Then go to File -> Examples -> Adafruit MPR121 -> MP121test.
It should work out of the box 📦
Checkoff 3
Show your instructor that you can use 6 capacitive touch sensors with arduino code installed!Part (4): Exploring Materials 🚨(Remixing)🚨(45 minutes)
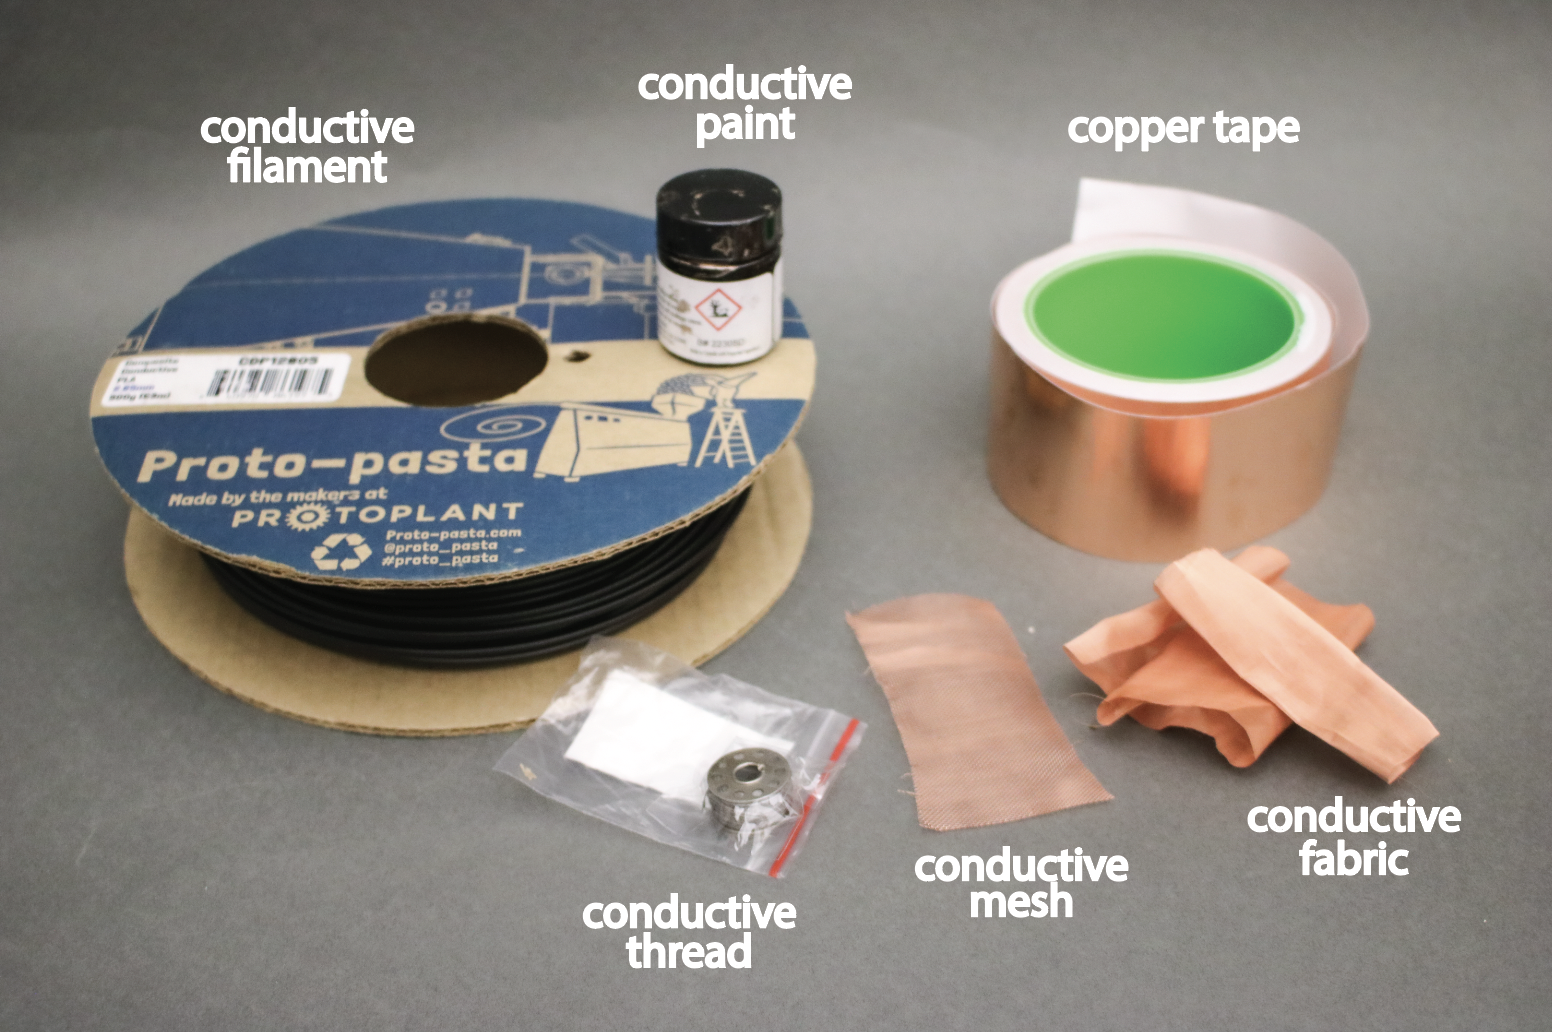
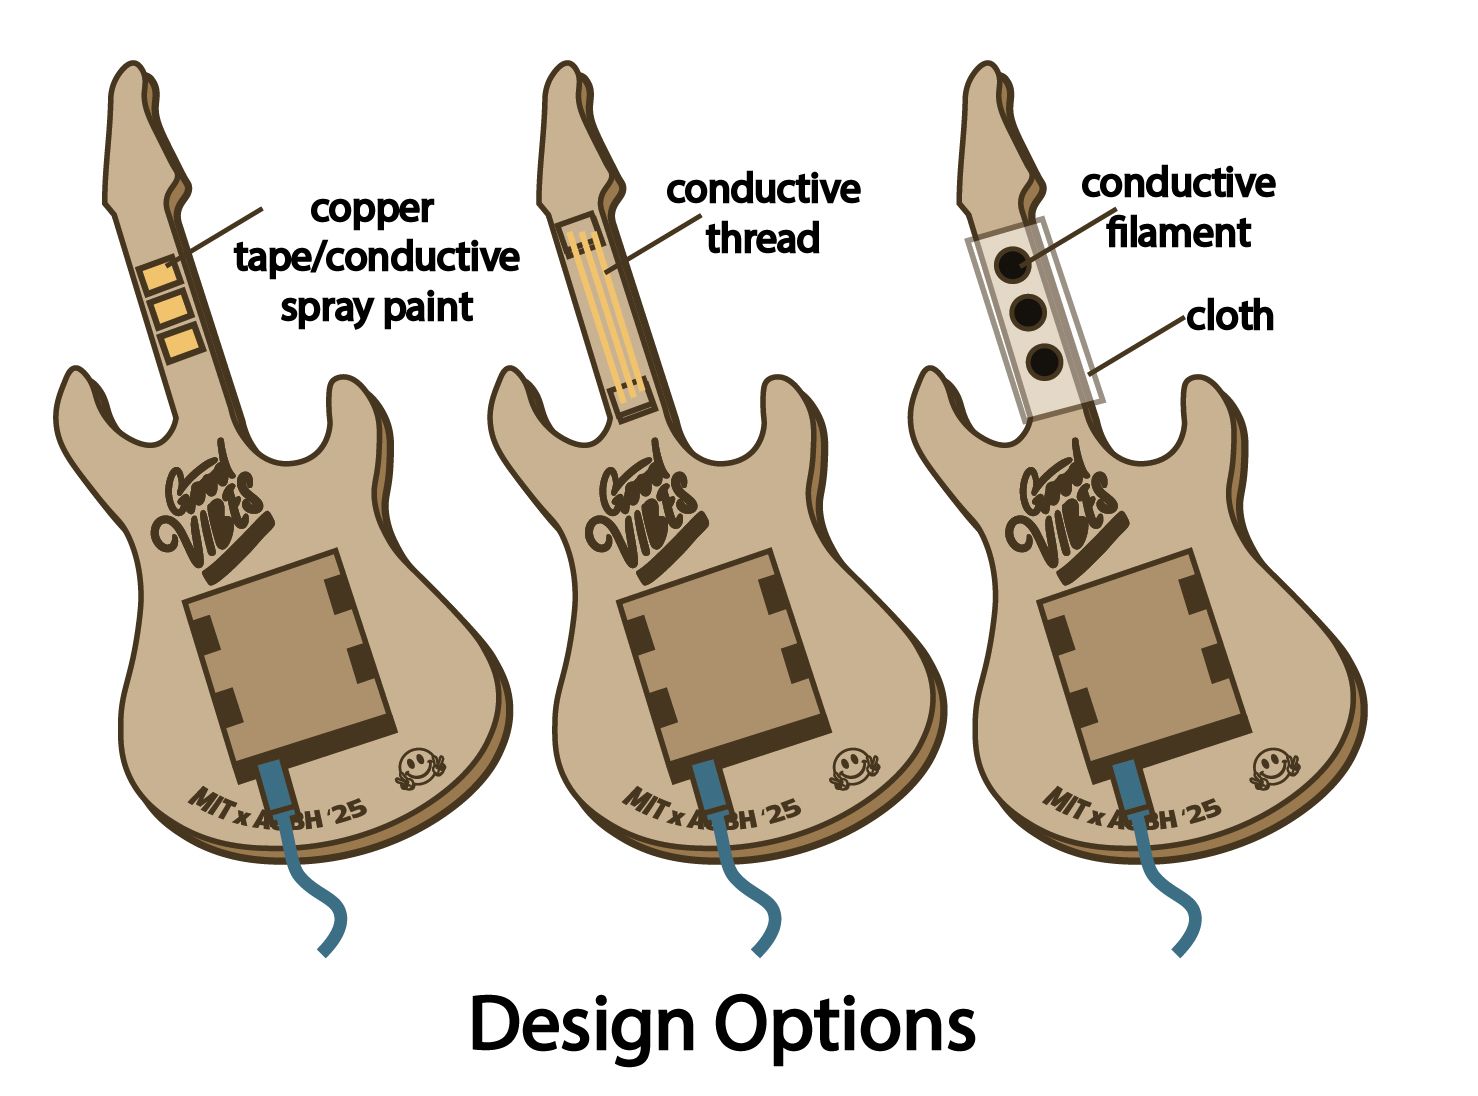
You have access to the following materials for creating your touch-sensitive designs. Choose a method other than using copper tape to experiment with a new approach.
1️⃣ Conductive Filament
A 3D-printable material that contains conductive additives. Keep in mind that its resistivity is high, which might limit its performance for certain applications.
2️⃣ Conductive Spray Paint
A versatile option that can turn almost any surface conductive. It’s ideal for irregular shapes but may require careful application to ensure even coverage.
3️⃣ Conductive Mesh
A flexible, pre-made conductive material. Can also lasercut using the fiber laser cutter.
4️⃣ Conductive Thread
A thread with conductive properties, perfect for integrating into textiles or other flexible assemblies. Ccan be sewn into designs.
📌 Choose Your Material
Select one material other than copper tape for your project. Consider the requirements of your design, such as flexibility, resistivity, and application ease.
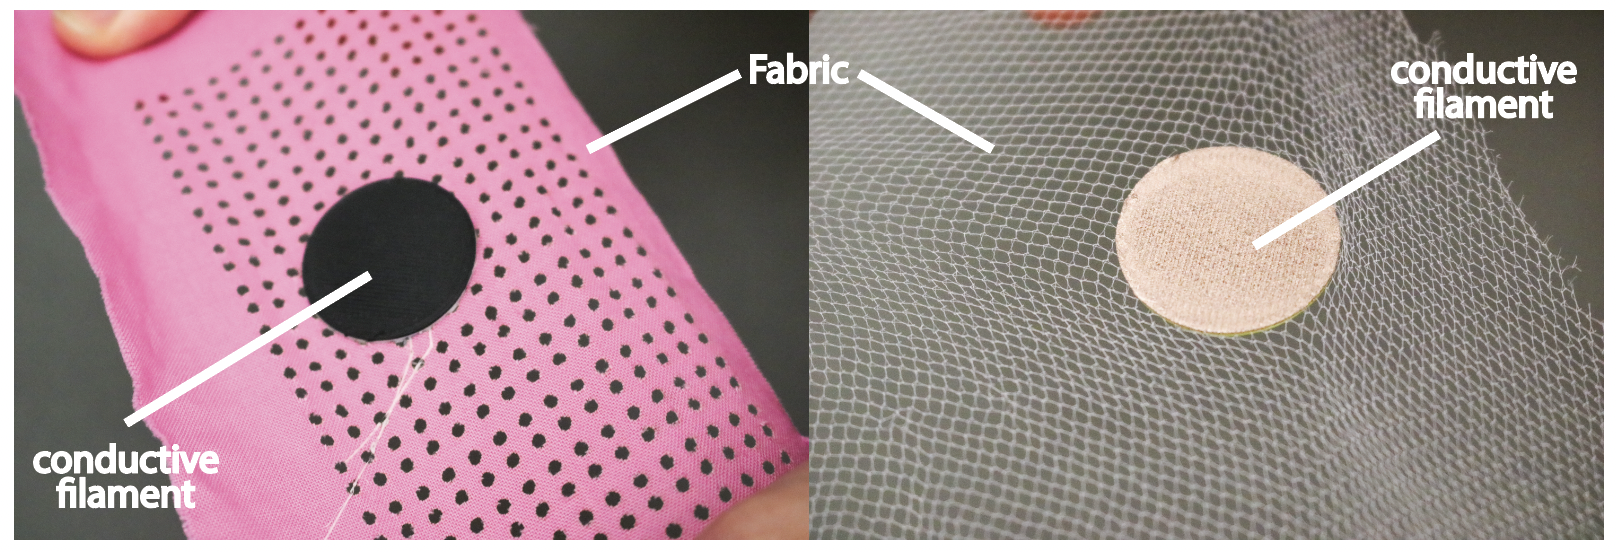
🧵 Combining Fabrics with 3D Printing
Integrating fabrics with 3D printing opens up so many design possibilities, especially when using conductive materials like 3D Printing filament or copper meshes. Here's how to approach this:
1️⃣ Conductive Filament
Conductive filament can be printed onto non-conductive fabric to create custom circuits or sensing areas. However, its high resistivity may limit performance in applications requiring low resistance.
2️⃣ Conductive Mesh
Conductive mesh is an excellent alternative since copper is a good conductor-- but it is limiting in form factor. You can combine it with non-conductive 3D printing material to create hybrid structures, leveraging the mesh's low resistance for improved functionality.
⚙️ Process Workflow
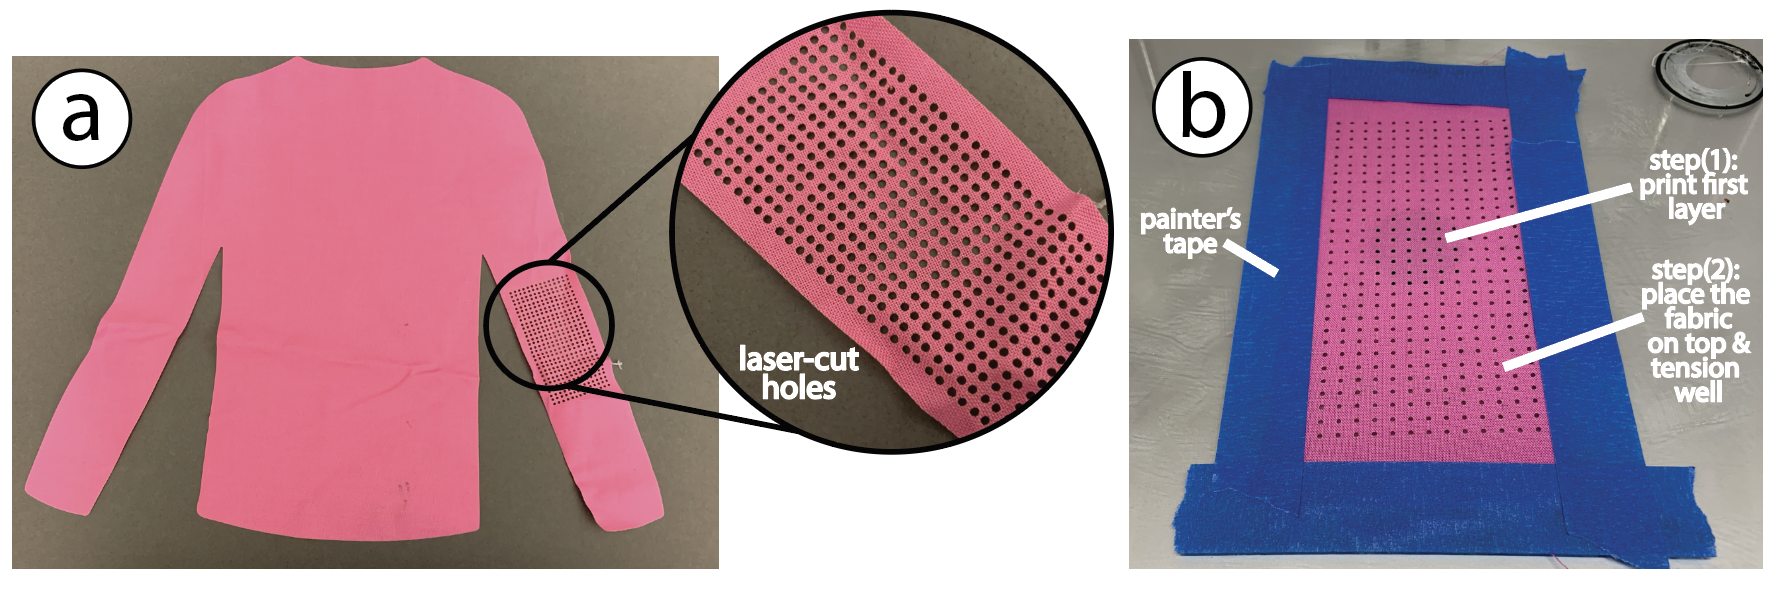
- Prepare the Fabric: For non-mesh fabrics, laser-cut holes where printing is required. Mesh fabrics naturally have holes and don’t need additional cutting.
- Initial Printing: Print the first two layers of your 3D design directly onto the print bed.
- Place the Fabric: Tension the fabric (mesh or non-mesh) over the print bed, ensuring it aligns with your design. You may use painters tape to do so!
- Continue Printing: Print the remaining layers on top of the fabric to integrate it into the structure.
🔄 Material Combinations
- 🧶 Use conductive filament on non-conductive fabric, keeping in mind the filament’s high resistivity.
- 🕸️ Use non-conductive filament on conductive mesh to combine the benefits of both materials.
On Spray-painting: You may also experiment with conductive spray-paintable material, which can conform to any surface.
On use of conductive thread (make it like a real guitar!): Try playing around with conductive thread- making your guitar "strings" conductive!
Checkoff 4
Pick a remix method you would like to explore for your guitar (or could be relevant to your final project!)Part (5): Designing a Guitar 🚨(Remixing | Optional )🚨 (5 minutes)
 Based on the material you chose, sketch your guitar and how you plan to wire connections to the material of your choice
(ie plan this out and discuss with your instructor). We have also provided a DXF file for a guitar here, which we will give you next lab!
Based on the material you chose, sketch your guitar and how you plan to wire connections to the material of your choice
(ie plan this out and discuss with your instructor). We have also provided a DXF file for a guitar here, which we will give you next lab!
Congratulations, your multi-input capacitive sensor is ready! 🎉